
Our Simple DIY Pallet Pool Storage is the perfect way to organize all your pool toys and accessories!

Jump to:
Mr. Juggling Act and I decided to purchase an above-ground pool for our backyard. I'm so glad we did because the kids have been having a blast, and it's not too bad for Mom and Dad either!
One of the biggest challenges was figuring out how to manage all of the pool accessories cluttering up our backyard. It's amazing how many things you suddenly need storage for:
- Towels
- Pool Floats and Noodles
- Pool Toys
- Life Jackets
- Googles
- Pool Net
I was inspired to create a cool pallet. We had recently purchased a Variable Speed Hammer Drill from Home Depot which came in handy for this project. (This is not an ad, but we really loved the product so we thought we'd share! This simple pool storage project can be easily done in a day if you have all the materials.

"Thank you Juggling Act Mama for this wonderful idea. We had fun making it and love the functionality."
Donna E. via pinterest
Do Pallets have Chemicals?
Reusing and upcycling old pallets are great ecologically friendly projects, but you want to be sure that you are not using a pallet that has been chemically treated with something that might be potentially harmful to you and your family. These will usually have a stamp that indicates the treatment code.
Look for a "national pallet" which are used within the US and most often are not chemically treated. Clean pallets without spills or stains are your best bet. For more on this, please read How to Tell if a Wood Pallet is Safe for Reuse.
Simple DIY Pallet Pool Storage
The following are affiliate links. We are a participant in the Amazon Services LLC Associates Program, an affiliate advertising program designed to provide a means for us to earn fees by linking to Amazon.com and affiliated sites.
Here's how to get organized and put together your own Simple DIY Pallet Pool Storage!
Materials:
- Pallet
- 2-3 cans Rust-Oleum Painter's Touch 2X 12 oz. Satin General Purpose Spray Paint (we used Seaside for the pallet, and Magenta for the accents)
- 4-6 Hooks and Double Hooks
- Small and Medium plastic baskets (if desired)
- 2 - ⅜" x 4" Galvanized Hex Bolts with washers and nuts
- 2 - ⅜" x 4" Galvanized Hex Lag Screws with washers
- 2 - #8 Pan Head Phillips Screws (Per Basket)
- 2 - ¼" x 1 ¼" Fender Washers (Per Basket)
Instructions:
Start by sanding down the palate to remove rough spots. It doesn't need to be perfect, just remove the roughest areas.
Pro Tip: I learned this one the hard way! Before painting, use a tack cloth to remove dust from sanding so it doesn't settle into the pores. You can find these are your local hardware store or online. Otherwise, your paint will look uneven.
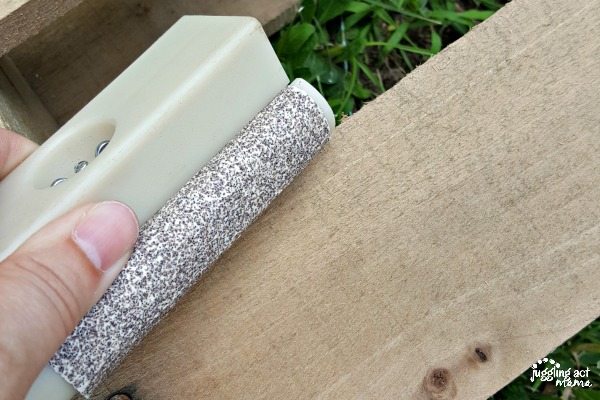
Brush off the pallet and spray-paint the entire thing. You'll want to get as much of the wood covered since this isn't pressure-treated. The spray paint will help protect the wood so it will last longer. I did two full coats on mine and then touched up a few other areas.

I wanted to add a pop of color with my hooks, so I spray-painted them an accent color. You can skip this step if you like. Attach the hooks.

Pre-drill the holes for the bolts in both the back of the pallet and the horizontal fence rail. When it comes time to hang the pallet, you definitely need someone to help you.
Pass the bolts through the fence and pallet and secure the washer and nut.
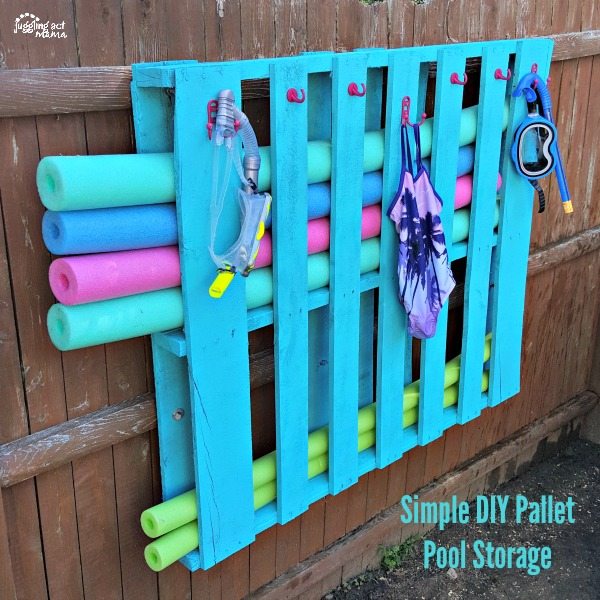
Once your pallet is hung, you can use it to store noodles, towels, and even though pool net.
How to Build Legs
If you do not have a wooden fence, you can build legs for the pallet. I suggest using 2x4s to make legs - cut (2) sections to 30″ in length. Attach them to the pallet with (4) ¼″ x 4″ lag bolts (two for each leg). However, you could also just lean the pallet against the side of your home, garage, or other type of fence.
More Pool Storage
I purchased additional hooks and a couple of inexpensive plastic baskets for even more pool storage space. We secured them with a washer and screw. The baskets are a great place to store diving sticks, water guns, goggles, and other small pool toys.

We also hung some larger TEKTON Bike Hooks to hold Olivia's Puddle Jumper, swim bar, and whatnot.

Storing the floats was another challenge. Instead of purchasing expensive solutions, we found deep Ladder Hooks for a fraction of the cost. We removed the spring-loaded mechanism and then mounted them to the fence and they are perfect for our pool floats.


DIY Pallet Pool Storage
As an Amazon Associate, I earn from qualifying purchases.
Equipment
- Sandpaper or sander
- Drill
Materials
- Pallet
- 2-3 cans Rust-Oleum Painter's Touch 2X 12 oz. Satin General Purpose Spray Paint we used Seaside for the pallet and Magenta for the accents
- 4-6 hooks/double hooks
- Small and medium plastic baskets if desired
- 2 - ⅜ " x 4" Galvanized Hex Bolts with washers and nuts
- 2 - ⅜ " x 4" Galvanized Hex Lag Screws with washers
- 2 - #8 Pan Head Phillips Screws per basket
- 2 - ¼ " x 1 ¼" Fender Washers per basket
Instructions
- Start by sanding down the pallet to remove rough spots. How long will depend on the condition of your pallet. It doesn't need to be perfect. (Tip: Use a tack cloth to remove dust from sanding so it doesn't settle into the pores. Otherwise, your paint will look uneven.
- Brush off the pallet and spray paint the entire thing. You'll want to get as much of the wood covered since this isn't pressure-treated. The spray paint will help protect the wood so it will last longer. I did two full coats on mine and then touched up a few other areas.
- Attach the hooks - you can spray them first if you'd like.
- Pre-drill the holes for the bolts in both the back of the pallet and horizontal fence rail. When it comes time to hang the pallet, you definitely will need someone to help you.
- Pass the bolts through the fence and pallet and secure the washer and nut.
- Once your pallet is hung, you can use it to store noodles, towels and even your pool net.
- Secure the plastic baskets to the fence if desired.
Notes
How to Build Legs
If you do not have a wooden fence, you can build legs for the pallet. I suggest using 2x4s to make legs - cut (2) sections to 30″ in length. Attach them to the pallet with (4) ¼″ x 4″ lag bolts (two for each leg). However, you could also just lean the pallet against the side of your home, garage or other type of fence.More Outdoor Living Projects:
You might also like these other outdoor living projects!

DIY Pallet Planter - a fun way to create a beautiful display of annual flowers like million bells.
More Summertime Ideas
- DIY Natural Insect Repellent Jars
- Wooden Spoon Garden Markers
- Keep Calm and Garden On Gift
- DIY Marbled Tin-Can Luminaries
- Cricut Glitter Iron-On Mermaid T-Shirt


Jodie says
THIS is BRILLIANT! I love it...
Seriously awesome!
Kristie Cook says
I don't have a pool or noodles {well the pool kind anyway} but this has given me a great idea for storing some other items! Love it!
Debrashoppeno5 says
This is ingenious. What a great way to keep pool toys in one place. I love the color you painted it. Pinne
Julie Nichols says
I love this pool side storage solution great way to keep everything in its place. I especially like the hooks that you added! Thank you for sharing at Talk of the Town!
Julie @ love my simple home.
Lynn says
Brilliant, Ang! 😉
Jessi @ Practically Functional says
This is brilliant Ang! I love stuff that's so simple, but makes a huge difference because it's so practical!
Ang Paris says
Thanks Jessi! 🙂
Crystal says
We just bought our first pool and got it all set up and ready to go and I can across this awesome idea for noodles and towels I definetly will be making this project
Ang Paris says
Yay! Hope you have loads of fun this summer! I'd love to see how it comes out - share on Instagram and tag @jugglingactmama 🙂
Kaz A says
This is the cutest idea! We don't have a backyard pool right now but I wish I had seen this back when we did! Love it!
Debra C. says
I think this is just brilliant! What a great way to organize all your pool accessories! Love the fun bright color you chose also!!!
Ang Paris says
Thank you! I'm kind of in love with that pretty teal color!
Danielle says
The pool nets are above the fence line and would be an eyesore for your nextdoor neighbor. But love the rest!
Ang Paris says
That's a good point! We happen to be on a hill and so it's not really an issue for our neighbors. However, you could slide the poles horizontally right into the pallet like the pool noodles to eliminate that issue if you like 🙂 Thanks so much for stopping by Danielle!!
Rosa says
Pool clutter can really make your pool area a totally mess! Thanks for such a great idea! Pinning 🙂
Tracy says
Great color! Love the idea!!
Gian Carlo says
I am thinking of building a koi pond frame made up of wooden pallets but is it safe to use to animals? as we know that pallets are treated with chemicals
Ang Paris says
Hi Gian!
Take a look at the "Do Pallets have Chemicals?" section. Some pallets are treated with chemicals, but many are not.
Carlo says
This is a great project, thank you for the tutorial!
Mogsy says
Great idea! We have a pallet in the garage - going to make this for our jacuzzi storage of chemicals, cup holders and towels! Thank you
Mogsy in Spain
Mary says
I love this! Thank you for sharing all of the instructions and even sharing your ideas for the bigger pool float storage. We just bought a pool because we plan on staying home a lot this summer (thanks to COVID-19). Found this gem on Pinterest. Thanks, again!!
Stina says
I Looove this! Can’t wait to build it! Question for you though, how did you do step 5??? “Pass the bolts through the fence and pallet and secure the washer and nut”
Are you going from your neighbors side? Just trying to figure out how to secure it when I can only imagine screwing it all directly into the fence without going through my neighbors side. And what are the 2 hex screws for if you use the 2 hex bolts?? Sorry I’m only half handy and it’s only me in my house to make this.
Ang Paris says
Hi Stina! Yes, you will have to go on your neighbor's side of the fence to secure the bolts.
Pop into your local hardware store and let them know you need this:
2 – 3/8″ x 4″ Galvanized Hex Bolts with washers and nuts
2 – 3/8″ x 4″ Galvanized Hex Lag Screws with washers
Have fun!
Leslie says
I’m not handy at all but giving this a try! Just bought everything! Can you tell me where you used the screws vs the bolts? Thank you!
Ang Paris says
Hi Leslie, the screws are used for the hooks on the front of the pallet. The bolts are used to mount the pallet to your fence.
Thanks for stopping by!
June says
How did you smooth the inside of the pallet? This may seem silly but I’m worried about the splinters shredding the noodles and making a mess of the pool.
Ang Paris says
You can use a sandpaper block if you think you need to, however the pallet we used wasn't that rough on the inside.
We haven't had any splinter issues. This is our third or fourth year with it 🙂
Barbara W says
My son just purchased his first home, along with it came a pool. I saw your idea, and loved it. So inexpensive and practical, and looks awesome to boot. Great idea, thanks for sharing it.
Corrina says
I'm in the process of making this!.. My question is should I put a clear protective coat on when done? Did you?
Ang Paris says
I did not do a protective quote. This is our 3rd year and I did do another coat of spray paint this season 🙂
Sandra says
Any suggestions if your pool fence is not wood? This is a great project o let the kids do.
Going to try one for sure.
Ang Paris says
Without a fence - or without a wooden fence, I would probably build legs for the pallet.
I suggest using 2x4s to make legs - cut (2) sections to 30″ in length. Attach them to the pallet with (4) 1/4″ x 4″ lag bolts (two for each leg).
Elizabeth Sawyer says
I'd love to see how you used the deep ladder hooks for the floaties. That has been my continuing challenge, and after 20 years with an in-ground pool, I still can't figure how to get the floaties up off the pool deck. I love this idea for storing the pool noodles. Nothing I've ever tried has been satisfactory. This is on my project list for this summer. My chairs and tables are already painted Magenta and Seaside. This will be a brilliant addition!
Ang Paris says
Hi Elizabeth! In the first photo, off the the right, you can see how we used large C hooks for smaller floaties. I've added a link to the post with the ladder hooks we used for larger intertube floats.