• Skip to primary navigation
  • Skip to main content
  • Skip to primary sidebar
  • About
    • Privacy Policy
    • Work with Me
  • Recipes
    • Breakfast
    • Appetizer
    • Dinners
    • Instant Pot
    • Slow Cooker
    • Salads
    • Side Dishes
    • Desserts
    • Grilling
    • Condiments and Spice Mixes
  • Shop
  • FAVORITES
  • Subscribe

Juggling Act Mama logo

  • Facebook
  • Instagram
  • Pinterest
  • TikTok
  • Twitter
  • YouTube
  • Home
  • Recipes
  • Game Day Menu
  • Holidays
menu icon
go to homepage
  • Home
  • About
  • Recipes
  • Quick Meals
  • Reader Favorites
  • DIY
  • Holidays
    • Facebook
    • Instagram
    • Pinterest
    • TikTok
    • YouTube
  • search icon
    Homepage link
    • Home
    • About
    • Recipes
    • Quick Meals
    • Reader Favorites
    • DIY
    • Holidays
    • Facebook
    • Instagram
    • Pinterest
    • TikTok
    • YouTube
  • ×

    Home » DIY

    DIY Address Plaque

    [published_or_updated] · by Angela Paris · 2 Comments[affiliate_disclosure]

    Pin
    Share

    A house number plaque is a quick, easy, and inexpensive way to add some serious style to the exterior of your home! This step-by-step DIY tutorial will show you exactly how to make a rustic house number plaque for your home.

    Rustic Wooden DIY Home Address Plaque Project

    You're going to be surprised how easy it is to make this DIY Address Plaque!

    Jump to:
    • Upcycled House Number Plaque
    • DIY Rustic House Number Plaque Tutorial
    • Materials
    • Instructions
    • Variations
    • More Home DIY
    • 💬 Comments

    Today's project is from my new friend Rachel from Joyful Derivatives.  I think you're going to love this simple project! Sprucing up your curb appeal doesn't mean you have to paint your whole house or do a ton of landscaping. Sometimes little touches can make a big different, like with this Succulent Wreath, DIY Cedar Planter Boxes, or today's House Number Plaque DIY Project. Enjoy! - Ang

    Upcycled House Number Plaque

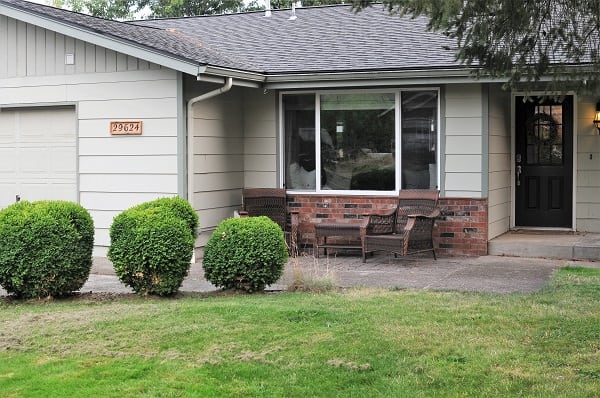
    We've had our basic black house numbers next to our porch light since we moved in two years ago, but I've always wanted to move them to the front of our house next to the garage.  There's an awkwardly large section of siding between the garage door and the corner of the house that just needs something. So, I reused my existing black house numbers, bought a single 6' board of cedar fencing and viola! An upcycled rustic house number plaque for less than $3!

    Rustic House Number Sign 1

    DIY Rustic House Number Plaque Tutorial

    In today's tutorial, I'm going to show you exactly how to build yourself a beautiful rustic house number plaque. This project is super simple and takes less than an hour to complete!

    Materials

    • Metal House Numbers
    • 6' Board of Cedar Fencing
    • Chop Saw
    • Hammer
    • Table Saw
    • Clamps
    • Nail Gun
    • Measuring Tape
    • Pencil or Pen

    Instructions

    STEP 1 & 2: Cut your inside board and attach the numbers.

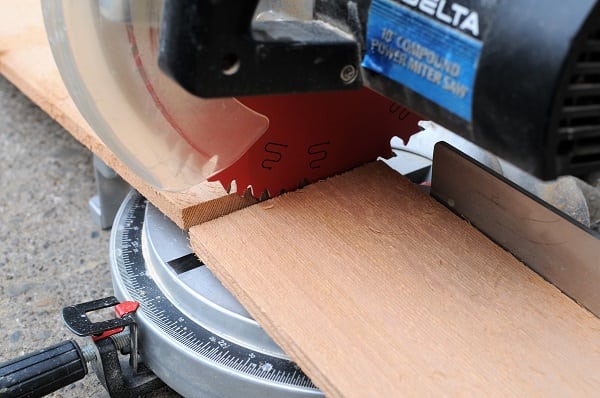
    I didn't even measure for this step! I simply laid my house numbers out on one end of my cedar board, got a feel for a width I liked, marked it with a pen, and cut it on the chop saw.

    Rustic House Number Plaque
    Rustic House Number Plaque: Step 1

    Once you have your inside board cut to size, lay your house numbers out on it, space them out evenly, and nail them in.

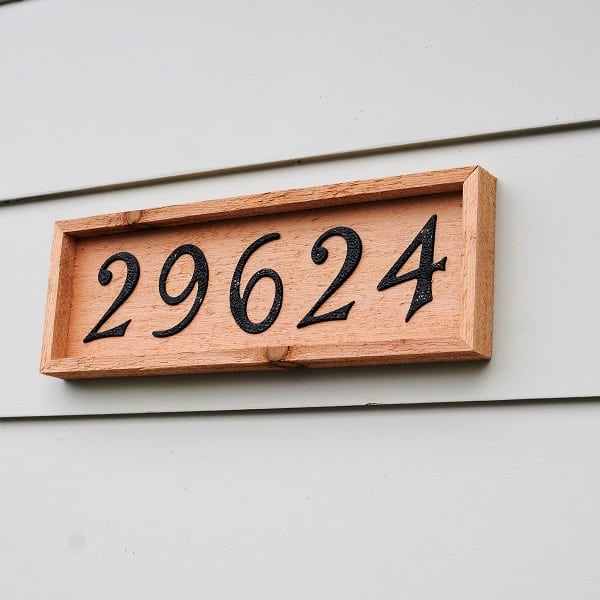
    Because we have 5 numbers in our address, I started by centering the "6" both horizontally and vertically and then spaced out the others accordingly.

    Rustic House Number Plaque
    Rustic House Number Plaque: Step 2

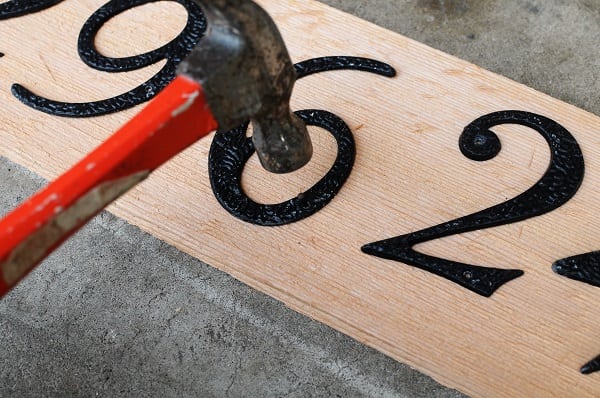
    If you wanted to, you could also measure the height of your numbers and then use painter's tape to mark the top and bottom of them across the board as a reference.

    STEP 3: Cut and install your frame.

    Using a table saw, rip down the remainder of your 6' cedar board into a piece that's 1 ¼" wide. Cut mitered ends for a frame that fits around your inside board and install it using clamps and a nail gun.

    Framing a Rustic Wooden DIY Home Address Plaque
    Rustic Wooden DIY Home Address Plaque: Step 3

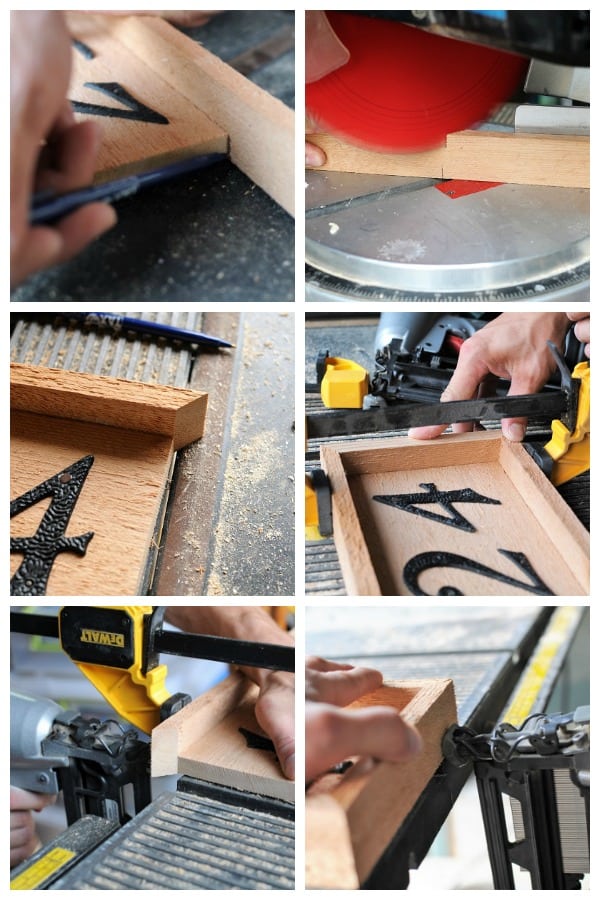
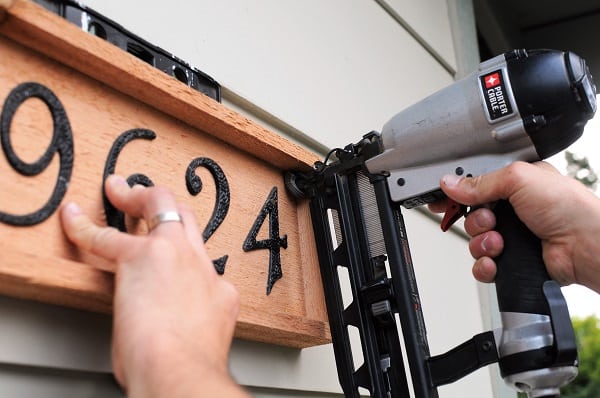
    STEP 4: Install on your house.

    Finally, the last step is to nail your beautiful, house number plaque onto your house! We simply used our nail gun and nailed in into the siding.

    Rustic House Number Plaque
    Rustic House Number Plaque: Step 4

    So, what do you think of our new rustic house number plaque ? I love the look of the cedar against our sage green siding!

    Rustic House Number Plaque
    Pin for Later

    Variations

    You can easily modify this tutorial to match your desires, too. Above all, you want the sign to be a reflection of your style and fit your home.  Here are some ideas:

    • If you want less rustic and more modern, use a sanded, dark-stained wood.
    • For a beachy coastal style, paint the wood white and distress it a bit.

    I hope you have fun with this DIY project! Not only is it easy (taking less than an hour to make), but it's also extremely affordable (at less than $3!) It's really a great way to add style to the exterior of your home.

    More Home DIY

    • Cedar Planter Box
    • DIY Pool Pallet
    • Tin Can Luminaries
    • How to Restore a Wooden Swing
    • Outdoor Patio Furniture
    • How to Hang Patio Lights
    • A tall cedar planter box on porch with boxwood.
    • Pool Pallet Storage with towels, pool noodles, etc.
    • Tin Can Luminaries hanging on a fence.

    About the Author: Rachel Joy

    I love teaching non-designers simple and affordable ways to create a home they love to spend time in and are proud to share with others. On my blog, Joyful Derivatives, I write tutorials to teach people how to decorate or update their home at low costs, give tips on easy and inexpensive ways to decorate your home and share my passion for home design through room makeovers and home renovation projects.

    A few of my most popular posts are “The Best Home Decor to Shop for at Thrift Stores” and “Magnolia Paints Color Matched to Behr“.

    Pin
    Share
    « Wine Cake Pops (How to Decorate)
    Ghost Mason Jar Craft - No Paint! »

    Reader Interactions

    Comments

    1. ColleenB.-Tx. says

      August 28, 2018 at 11:06 am

      Looks Great.
      Seeing how our house sits back from the road a ways, we need to make this to mount on our mailbox post so that emergency vehicles can spot our address easier.
      What a great gift this would make for someone / new neighbor, family members, etc.

      Reply
      • Ang Paris says

        August 28, 2018 at 11:23 am

        I hadn't thought of it as a gift, but yes, what a lovely idea for a housewarming!

        Reply

    Leave a Reply Cancel reply

    Your email address will not be published. Required fields are marked *

    Recipe Rating


    Primary Sidebar

    Welcome! I'm Ang'e - the Juggling Act Mama! I love sharing quick and easy recipes, creative DIY projects, and fun family travel with you. Like many of you, I am a multi-tasking mama juggling priorities which is why here I offer solutions to tame your hectic lifestyle.

    More about me →

    Delicious Smoothie Recipes Story

    POPULAR POSTS

    • Homemade Cowboy Butter in a small yellow dish with a butter knife.
      Cowboy Butter
    • Top down view of teriyaki chicken wings.
      Honey Teriyaki Chicken Wings
    • Sheet Pan Pancakes with Pancake Mix: stack of pancakes with strawberries and blueberries.
      Sheet Pan Pancakes with Pancake Mix
    • Cheesy John Wayne Casserole on a plate with a fork.
      John Wayne Casserole

    Footer

    ↑ back to top

    About

    • Privacy Policy
    • Disclaimer
    • Terms & Conditions
    • Republication Policy

    Follow Us

    • Facebook
    • Pinterest
    • Instagram
    • YouTube
    • TikTok

    Contact

    • Contact
    • Work with me
    • Copyright Notice
    • Trademarks

    Juggling Act Mama is more than just recipes—it's a trusted resource for busy families looking to make mealtime simple, stress-free, and delicious. Whether it’s a 30-minute dinner, a slow cooker shortcut, or a budget-stretching batch-cook plan, we’re here to help you juggle less and savor more.

    READER FAVORITES

    • Close up square image of Chicken Broccoli Pasta Bake in a bowl with a fork.
    • Close up of cowboy spice rub on a small wooden spoon.
    • Close up of Puff Pastry with Chicken on a plate.
    • Pool Pallet Storage with towels, pool noodles, etc.
    • Party Cotton Candy Mocktails surrounded by confetti.
    • Hand holding a ppot with a plant and adding soil.
    • A tall cedar planter box on porch with boxwood.
    • Close up of mashed sweet potatoes.
    • Two glasses of Tropical Storm Punch with straws and drink umbrellas.
    • Summer Beach Tote Hack: bucket with a handle full of summer essentials like sunscreen and bug spray.
    • Close up of Mermaid Drink Lemon Drop cocktail.
    AS SEEN ON

    Copyright © 2011-2025 Juggling Act Mama