
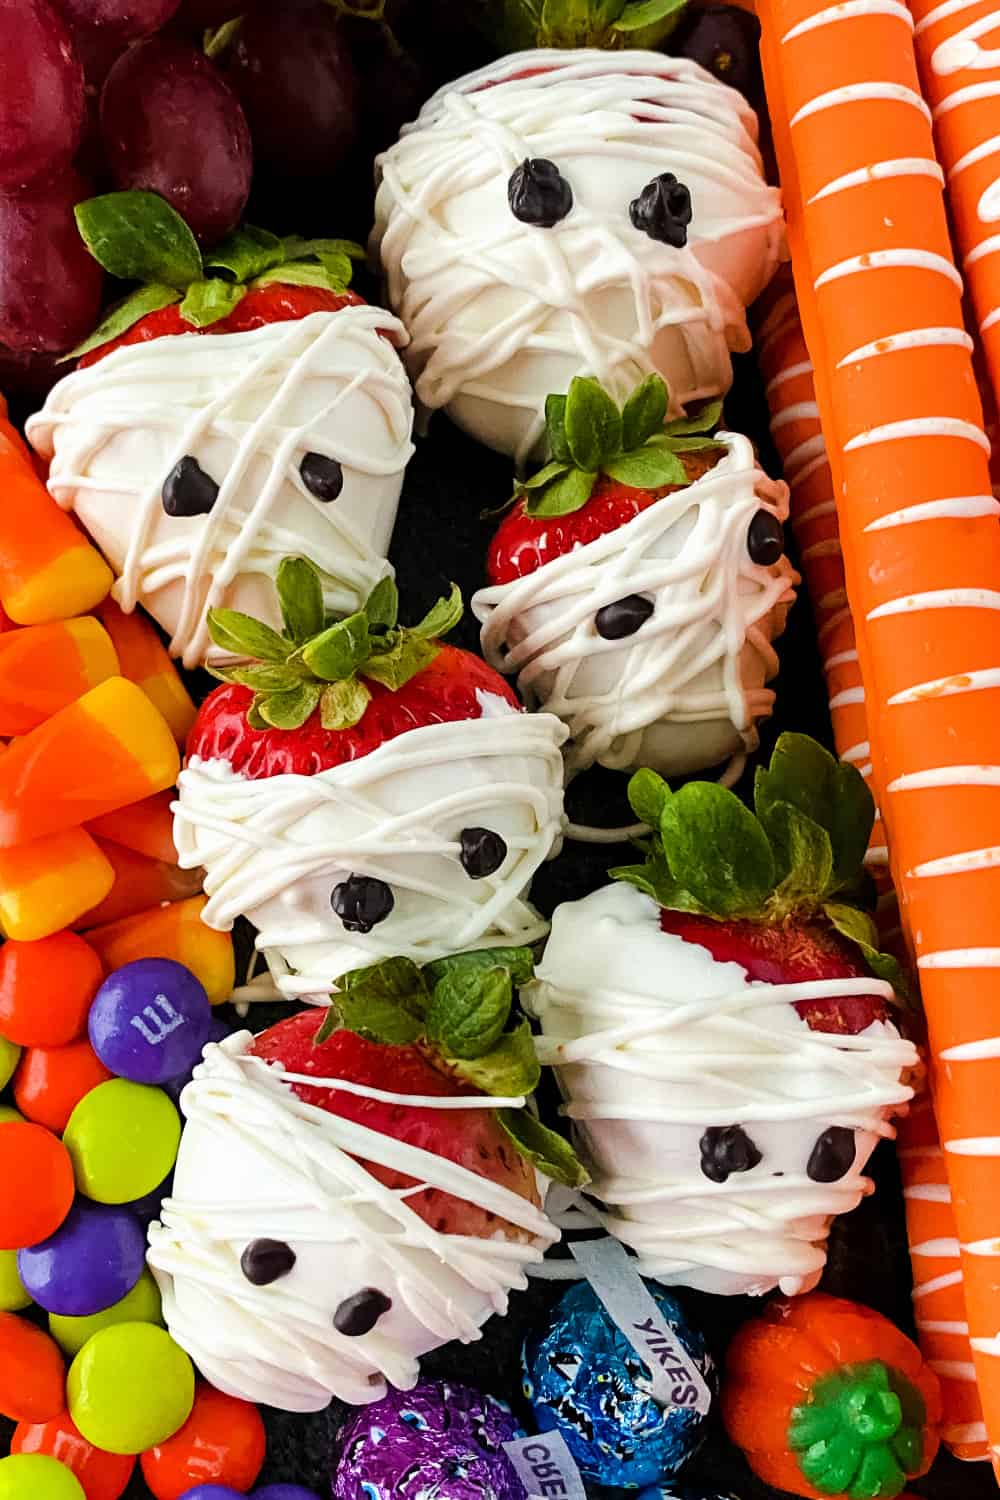
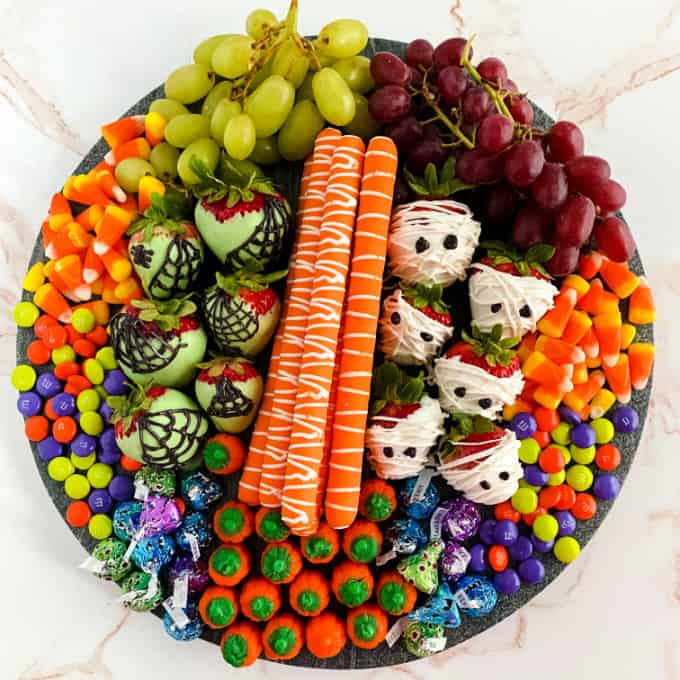
Halloween Chocolate Covered Strawberries dipped in chocolate and decorated as mummies or with spider webs are just about the cutest things! These fun treats are perfect for your next Halloween Party or for making a Halloween Charcuterie Board.
Jump to:
Chocolate Covered Strawberries are perfect just about any special occasion, and they're fairly simple to make, too.
Can you believe that it’s the “spooky season” again? It seems to always ‘creep’ up on me every year! Apart from having to find new and creative Halloween recipes to experiment with, it can sometimes be a challenge to balance out all those high-sugar Halloween candies with fresh and natural alternatives. This year I found a winner - Halloween Chocolate Covered Strawberries.
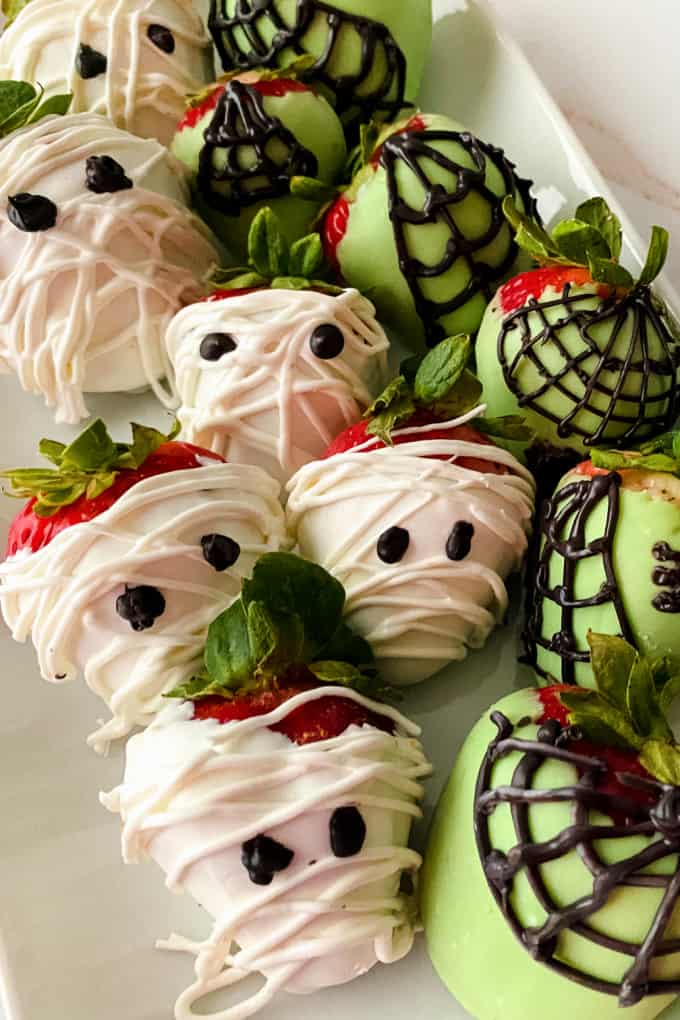
These cutesy strawberry mummies and berry spiders are not just adorable, they’re really delicious chocolate-coated treats too, requiring minimal ingredients and very little time! Serve them at Halloween parties to be enjoyed by kids and adults alike.
Happy Halloween, everyone!
❤️ Why You'll Love This Recipe
- These Halloween Chocolate Covered Strawberries make extremely festive and happy halloween inspired treats that are the perfect addition to your Halloween charcuterie board!
- These strawberry mummies and berry spiders offer a cute alternative to the spooky treats usually served during Halloween. They’re my go-to when hosting Halloween parties for young children.
- They’re a great way of adding in some healthy Halloween treats among all the usual high processed and sugar-loaded Halloween candy!
🧂 Ingredients
- fresh strawberries
- neon green candy melts
- white candy melts
- black candy melts
Note: I prefer using candy melts because I find that they are easier to work with in general. However, should you use semisweet chocolate chips, add a teaspoon of shortening or butter as you melt the chocolate.
This is meant to be a brief overview of the Halloween Chocolate Covered Strawberries recipe. For step-by-step instructions and a full printable recipe card with ingredients, please scroll down to the teal box below.
🔪Instructions
- Line a cookie sheet / sheet pan with a piece of parchment paper.
- Clean your strawberries.
- Dry them well with paper towels. The chocolate won't stick if they aren't dried well.
- In a small microwave-safe bowl, melt the candy melts according to package instructions.
- Stir the chocolate mixture making sure it's smooth. Be careful not to overheat.
For the mummy:
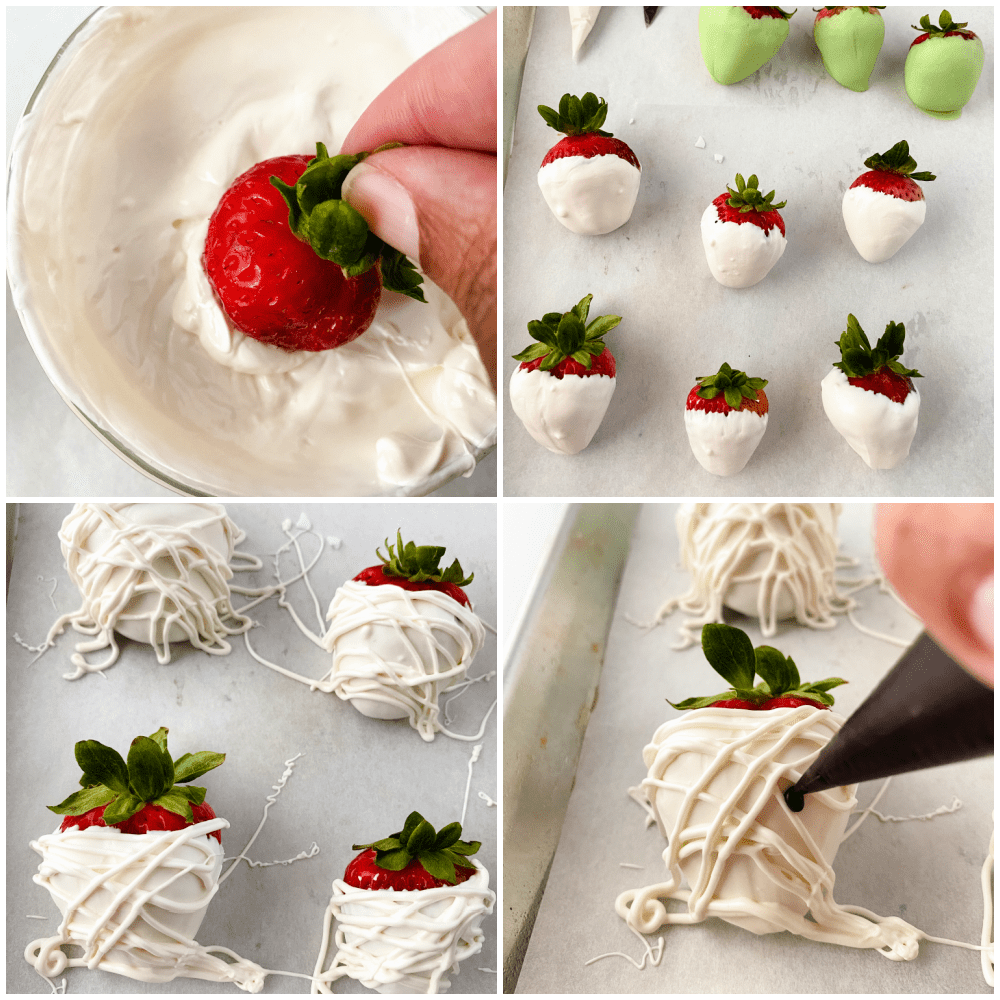
- Dip each berry in the melted white chocolate candy melts.
- Allow the excess chocolate to drip off.
- Let sit on parchment 10-15 mins until the chocolate has.
- While they set up, add the remaining white candy to a piping bag. If you're using a ziploc bag, cut off a tiny corner.
- When ready, drizzle lines back and forth and diagonal to create your "wrapping".
- Add two dots for eyes by piping on black chocolate.
- Repeat with remaining strawberries.
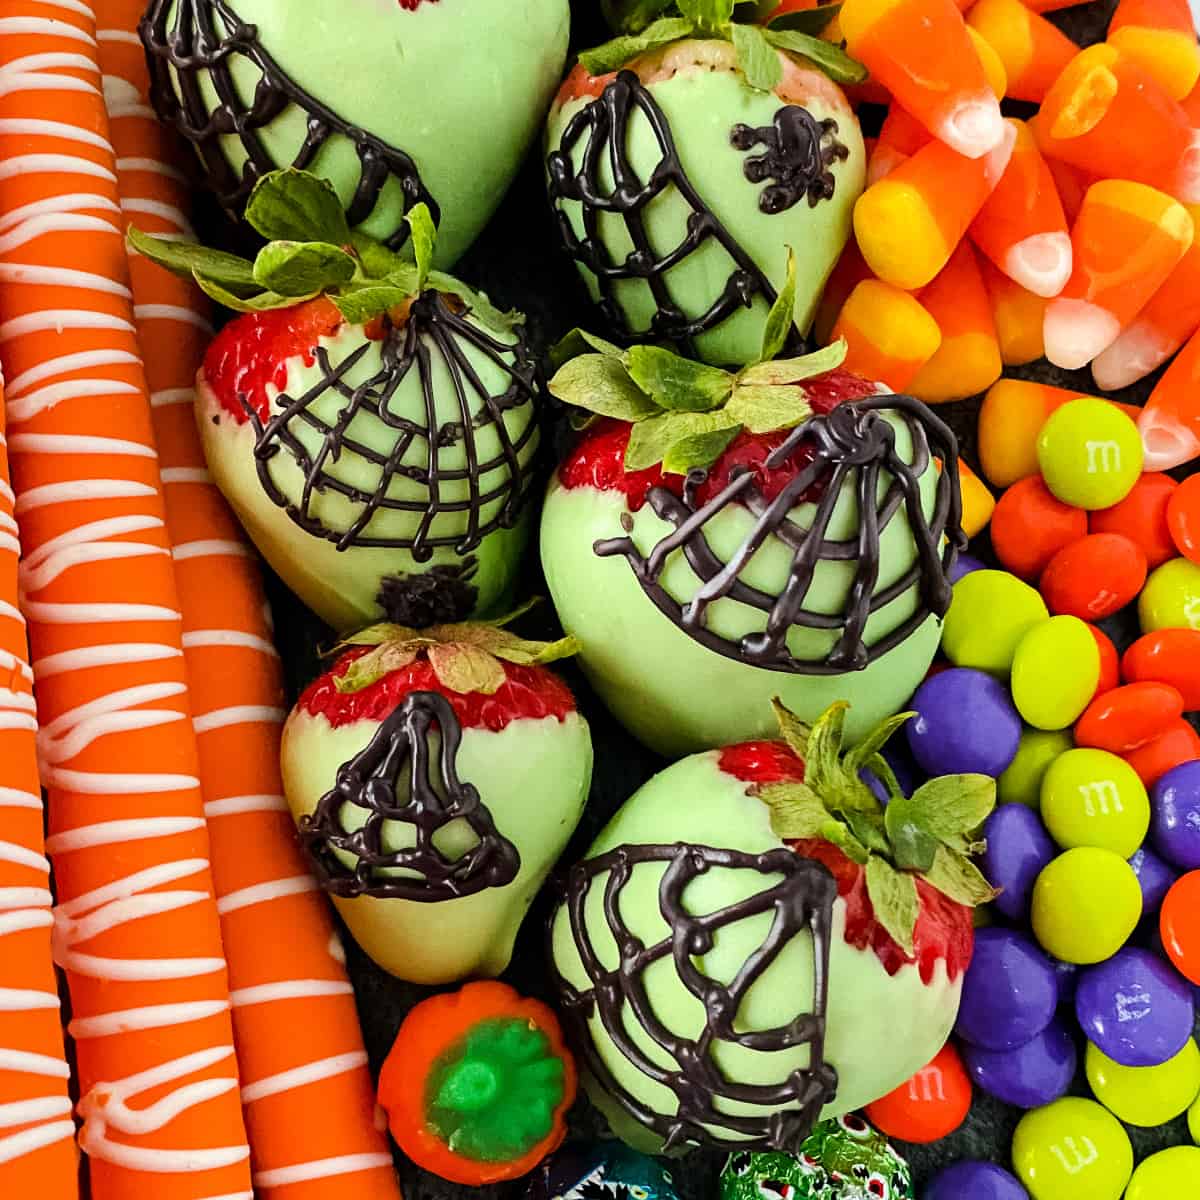
For the Spider Berries
- Dip strawberries in neon green candy coating and allow any extra chocolate to drip off.
- Place on parchment to set for approximately 10 - 15 minutes.
- Using the melted black chocolate, pipe on a large triangle, then create your web with vertical lines inside the triangle. Next, add horizontal lines between the spaces left on the vertical lines to create a spider web.
- Let sit 5-7 min to harden.
Equipment
The following are affiliate links. We are a participant in the Amazon Services LLC Associates Program, an affiliate advertising program designed to provide a means for us to earn fees by linking to Amazon.com and affiliated sites.
- Parchment Paper
- Piping bags or ziplock bags
- Dry Measuring Cups
- Mixing Bowls
- Rubber Spatula
Be sure to check out my Juggling Act Mama Storefront on Amazon where you'll find all kinds of great products to make your life easier! Thanks so much for being a part of Juggling Act Mama ❤
⏲️ Storage
Chocolate-covered strawberries are really best the same day you make them. They are best stored at room temperature with just a piece of plastic wrap loosely on top of them. They will last about a day.
While these could be made a day in advance and stored in the fridge, you'll likely to run into a few challenges: condensation may form on the outside, and the chocolate may come off.
Chocolate strawberries in the fridge should be stored in an airtight container lined with a couple of paper towels. If you must stack them, the best way is to separate the layers with wax paper or parchment paper. Refrigerated strawberries will last about 2 days.
⭐ Tips
- Line a baking sheet with parchment paper for easy transport.
- Be sure to read instructions on the melting chocolate carefully and follow them closely. Always use a microwave-safe bowl.
- The melted chocolate will be extremely hot. Always handle the hot bowl and the chocolate with care. This is a job best suited to adults.
- Chocolate becomes hard fast, so work quickly!
- Paramount crystals, coconut oil, or vegetable oil can help melt chocolate, although you may not need those if you're using candy melts.
- If the chocolate seizes up and won't melt, just toss it. You can't save it. Starting over is the only option.
💭 Frequently Asked Questions
Here are some questions (and answers!) readers often ask about Chocolate Covered Strawberries.
Dipping chilled strawberries in hot melted chocolate certainly help to prevent the strawberries from scorching, turning soggy and soft as a result.
I recommend chilling the strawberries before applying the chocolate since you have to work quite quickly when dipping the strawberries before the chocolate hardens which means that you will be working with hot melted chocolate.
Just make sure that any condensation from the chilling time has been dried off before dipping into the melted chocolate. You can also blot off any moisture with a paper towel.
If you’re struggling to get your melted chocolate to stick to the strawberries, it’s likely due to them not being completely dry.
Once you’ve washed your strawberries, it’s really important that you thoroughly dry each berry using paper kitchen towels. This includes the berry itself as well as the leaves. If your strawberries are even slightly damp, you run the risk of the chocolate not sticking and sliding right off the berries!
Once dipped in the melted chocolate, each strawberry should take around 10-15 minutes to set.
The spider berries do require an additional 5-7 minutes to set as a result of adding the black spider web piping, totaling an average of 18 minutes for these not-so-spooky treats.
Make sure that you place your parchment paper-lined tray with chocolate-dipped strawberries in a cool, dry area of your kitchen while they set.
Yes, there is! Whether you’re making these treats for halloween parties or whipping up a batch of chocolate-dipped strawberries for another occasion, it’s important to understand the difference between melting chocolate and chocolate chips.
Melting chocolate-like candy melts will melt to a smooth consistency which is ideal for dipping treats into. Chocolate chips, however, are a little more resistant to melting which often results in people overheating the chocolate which in turn affects how it sets and also tends to result in “blooming” (discoloration on the surface of chocolate as a result of overheating the melted chocolate).
📖 Variations
You could also use orange candy melts and make pumpkin faces with a little bit of the melted black candy melts.
Use candy eyes instead of piping them on with chocolate or black frosting.
Instead of chocolate mummies, try making ghost faces on the strawberries dipped in the white chocolate melts. It's fun to make a variety of cute and spooky strawberries.
If you prefer to use chocolate instead of candy wafers, I like this brand (although you can usually find it cheaper at Walmart). Use white chocolate and gel food coloring to make different colors like green or orange chocolate.
😋 Similar Recipes
Next time, try one of these Halloween recipe ideas:
- Halloween Popcorn Mix - a delicious addition to spooky movie night.
- Pumpkin Cheesecake Bites - a fall treat that went viral!
- Halloween Cookies and Milk Shooters - perfect for kids.
- Chocolate Covered Strawberries - compromise with chocolate and fruit!
Find loads of fun No Bake Halloween Desserts that the whole family will love!
🍴 Serving Suggestions
Serve your chocolate strawberries alongside other fun and delicious Halloween treats like our Easy Halloween Marshmallow Pops or Halloween Homemade Peanut Butter Cups. They are perfect for adding to a Halloween Snack Board, too.
🎃 More Halloween Ideas
You might also like one of these great ideas for the Fall and Halloween season:
Not ready to make these cute Halloween strawberries yet?
Don’t forget to pin the recipe for later! When you do make it, please be sure to tag me on Instagram @jugglingactmama or #jugglingactmama – I’d love to see your pictures! And finally, if you get a chance, please comment and leave me a ⭐⭐⭐⭐⭐ rating below!

Halloween Chocolate Covered Strawberries
As an Amazon Associate, I earn from qualifying purchases.
Ingredients
- 12 Strawberries washed and patted dry
- ¼ cup neon green candy melts
- ¼ cup white candy melts
- 2-3 tablespoons black candy melts
Instructions
- Clean your strawberries.12 Strawberries
- Dry them well with paper towels. The chocolate won't stick if they aren't dried well.
- Melt the candy melts according to package instructions. Tip (adding paramount crystals, vegetable oil or coconut oil will help thin out thick chocolate).
- Stir the chocolate making sure it's smooth. Be careful not to overheat.
For the mummy:
- Dip each berry in the melted white candy.¼ cup white candy melts
- Let sit on parchment 10-15 mins until the chocolate has.
- While they set up. add remaining white candy to a piping bag.
- When ready, drizzle lines back and forth and diagonal to create your "wrapping".
- Add two dots for eyes by piping on black chocolate.2-3 tablespoons black candy melts
For the Spider Berries
- Dip each strawberry in neon green candy coating and place on parchment to set for approximately 10 - 15 minutes.¼ cup neon green candy melts
- Using the melted black chocolate, pipe on a large triangle, then create your web with vertical lines inside the triangle. Next add horizontal lines between the spaces left on the vertical lines to create a spider web.2-3 tablespoons black candy melts
- Let sit 5-7 min to harden.
Equipment
- Parchment Paper
- Piping bags or ziplock bags
- Paramount crystals, coconut oil, or vegetable oil
Notes
- Line a baking sheet with parchment paper for easy transport.
- Be sure to read instructions on the melting chocolate carefully and follow them closely.
- Paramount crystals, coconut oil, or vegetable oil can help melt chocolate, although you may not need those if you're using candy melts.
- The melted chocolate will be extremely hot. Always handle the hot bowl and the chocolate with care. This is a job best suited to adults.
- Chocolate becomes hard fast, so work quickly!
- If the chocolate seizes up and won't melt, just toss it. You can't save it. Starting over is the only option.
Comments
No Comments